Showing posts with label ubuntu. Show all posts

Tuesday, August 25, 2009

Pidgin 2.6.1 is here !


A major upgrade of the favorite universal chat client 'Pidgin' has been released.
Detailed instructions of installations or upgrading can be found here. Some of the major upgrades are the new Voice and Video support for XMPP !! Hurray ! Apart form that, the general icons have also been changed and they now look much more decent. Check it out for yourselves !

Friday, May 15, 2009

Installing adobe flash plugin on Ubutnu 9.04 ( Jaunty )

I found a way to install the adobe flash plugin on my ubuntu box. Till now I was trying to install the .deb package from the adobe site which is named as (ubuntu 8.04+ ) and it alway got installed but never worked! So here's a way:
  1. Download this package.
  2. Close your firefox.
  3. Open it with your archive manager and extract it in you home directory.
  4. Open a terminal and type: $~/install_flash_player_10_linux/flashplayer-installer
  5. Follow the instructions and do a 'yes' when it says that the plugin will be installed in your home directory in the .mozilla folder.
Done! :)

Saturday, May 2, 2009

Idea Netsetter on Ubuntu Jaunty Jackalope : Step by step procedure

It took some time but I managed to configure the Idea Netsetter wireless USB plug and surf device on my Ubuntu laptop. It wasn't as tough as I had thought. Here's the procedure:

Step 1. Write the following in your /etc/wvdial.conf file, save and close:


[Dialer Defaults]
Modem=/dev/ttyUSB0
Baud = 460800
Init 1 = AT+CGMM
Init 2 = AT+CMEE=1
Init 3 = ATE0
Init 4 = AT^HS=0,0
Init 5 = AT+CFUN?
Init 6 = AT+CLCK="SC",2
Init 7 = AT+CPIN?
Init 8 = AT+CLCK="SC",2
Modem Type = USB MODEM
Phone=*99#
Username = idea
Password = idea
Dial Command=ATDT
Stupid Mode=1
ISDN=0

APN = internet


Step 2. Add the following lines to your /etc/network/interfaces file:

iface ppp0 inet ppp
provider ppp0
auto ppp0


It would look something like this (only the encircled part is important):


Step 3. Restart the network services by the following command:

$ sudo /etc/init.d/networking restart

Step 4. Go to System-> Administration -> Network. You'd see something like this:

Uncheck the 'Wired' connection (disable it). Now go to the properties of Point to point connection do the following settings in the respective tabs:

[GENERAL]:
  • Check on 'Enable this connection'
  • Connection type: PPPoE
  • Username: idea
  • password: idea
[MODEM]:
  • Ethernet interface: eth0
[OPTIONS]
  • Check 'Set modem as default'
  • Check 'Use the internet service provider nameservers'
  • Check 'Retry if connection breaks'

Step 5. Again restart the network connection (step 3).

Step 6. Plug in your Idea Netsetter in one of the USB ports and run the following command in your terminal:

$ sudo wvdial


That's it .. if everything's fine wvdial would show your new Local and Remote IP address for the idea connection.

Have fun.

Wednesday, April 1, 2009

Useful command to edit .conkyrc

Friends this is a simple command I use whenever I edit my conkyrc file:

$while true; do conky -q -i 10; sleep 3; done

Starting conky this way kills it and restarts it after every 3+10*n seconds, where n is the update interval mentioned in your conkyrc file. So, you can open ~/.conkyrc file in your editor run the above command. You would see the changes on the conky right on your desktop as it is restarted again and again. (please dont forget to keep saving the file as you edit it to make this thing work).

By the way, I have edited a conkyrc file i found on a webiste and finetuned it !! My conky is simply amazing now :) I'd post the file in my next post (and a snapshot of my desktop).

Friday, March 20, 2009

Switching to ( or changing ) static IP address on Ubuntu Intrepid

Today, somehow the network of my college got reconfigured or something, and all subnets got changed hostel wise. Hence, the network wasn't being accessed by the old IP addresses. Now, in the earlier versions of Ubuntu (before Intrepid) it was relatively easy to change the static IP addresses from the Network Manager in the panel, but Intrepid onwards, this intreface has been changed and I had been wondering for a while how to do it. Now, today, since it was an absolutely desperate situation, I finally figured a way out.

Solution:
  • Open the file /etc/network/interfaces in your favourite editor:

        $ sudo gedit /etc/network/interfaces


You would find something like this:


auto lo
iface lo inet loopback


iface eth0 inet static
address 10.4.1.41
netmask 255.0.0.0
auto eth0


  • If you don't find the last 4 lines in this file, then your network configuration is set to dynamic IP. So, add these four lines to the end of this file. And, if your see these lines, it means your have previously set your IP address to static. Now, to change your static adderss, change the address given below the line 'iface eth0 static' (here, 10.4.1.41)to whatever address u want.

  • Finally, restart the networking service by the command:

      $sudo /etc/init.d/networking restart

  • Verify the change by the command:

$ip addr

You would see the new IP address in the eth0 section!

~~~~~~~~~~~~~~~~~~~~~~~~~~~~~~~~~~~~~~~~~~~

Now, I stumbled upon this solution when I was checking out the man pages of 'ip' and related commands and then I tried the command for restarting the network. When it didn't work, I opened the file /etc/init.d/networking and found that that the script uses the files in the /etc/network directory. There I found the file named 'interfaces' and upon opening it, I knew this was what I was searching for!

Wednesday, March 18, 2009

Problems in installing Netbeans IDE 6.5 on Ubuntu Intrepid [solved]

I had some problems installing the Netbeans IDE 6.5 on Ubuntu Intrepid. After running the file netbeans-6.5-python-linux.sh in the terminal, there was an error:

net beans lexical error or unexpected token, expected valid token

If you are facing similar problems, refer to earlier post :
JAVA Swing and AWT applications freezing in Ubuntu
The solution to this problem is the same as mentioned in the above post. Though I had been using Netbeans 6.1, the configuration had changed somehow! Anyways, after following the instructions, the problem should get solved.

Happy Netbean-ing ..

Tuesday, February 3, 2009

Thunderbird wrap text problem [sloved]

Well, I saw many people having problem with Thunderbird not wrapping text at the default set 72 chars. Huh, I figured out the solution. The edit/options >preferences > composition > general tab has an entry box saying
"wrap plain text messages at __ characters"

the default set is 72 characters. Now what happens is that most of the mails that we send are HTML or 'unknown' by default. And the entry box says "plain text" not HTML. So, go to the most frequently mailed addresses in your addressbook in thunderbird and select 'plain' text message as the default in the contact details for each. :) it was not a problem, it was just obvious !!

Sunday, February 1, 2009

Disabling remote access to phpmyadmin

I installed the LAMP + phpmyadmin combo yesterday on my Ubuntu Intrepid machine for hosting a local website.
But later I realized that the phpmyadmin page, though password protected, was visible throughout my local network! So, to disable remote access to phpmyadmin , add the following code to the end of your /etc/apache2/apache2.conf file ..


# Disabling phpmyadmin for remote access
<directory>
Order Deny,Allow
Deny from all
Allow from localhost
</directory>

Saturday, November 8, 2008

JAVA Swing and AWT applications freezing in Ubuntu

Now I had been facing this problem from quite some time, but recently found a quick solution. Well, by default, the system uses GIJ as the Java byte interpretor and possibly, it causes the applications to freeze. I had installed the sun-java-6 jdk package but it was not functional because gij was the default one.

Steps:

1. Install the sun-java6-sdk package.
2. Find the default jvm being used by your machine by typing: java -version
3. In case it shows 'gij', then type: sudo update-alternatives --config java
It would list all the possible options with a number corresponding to each. For me it shows:

There are 5 alternatives which provide `java'.

Selection Alternative
-----------------------------------------------
1 /usr/bin/cacao
* 2 /usr/lib/jvm/java-6-sun/jre/bin/java
3 /usr/lib/jvm/java-1.5.0-sun/jre/bin/java
4 /usr/bin/gij-4.3
+ 5 /usr/lib/jvm/java-gcj/jre/bin/java

Press enter to keep the default[*], or type selection number:

4. Type in the corresponding number to java-6-sun/jre/bin/java, and press return.


That's all... unsure the version of java again by typing th command in step 2, hopefully you will see something different :)

Friday, November 7, 2008

How to fix the No Sound problem in Ubuntu 8.10 (Intrepid)

You might have come across the 'no sound' problem after a fresh installation of Ubuntu 8.10 Intrepid. Well, there are a couple of solutions around and this one worked for me :

1. Go to System -> Administration -> Users and Groups


2. Click on 'Unlock' and enter password.
3. Next, go to 'Manage Groups'.
4. Search for the groups 'pulse' and 'pulse access'


5. For both of these, double click on them and add yourself to this group by checking on the check-box.


6. Hopefully, you are done !! Logout with ctrl+alt+backspace, and login again.

Sunday, October 19, 2008

Virtualbox resolution problem

Problem: Guest machine doesn't switch to full screen even after installing VBox additions.

One possible solution:
Switch to seamless mode (host key + L ), and then back to full screen mode. !!


I run Windows XP on Ubuntu using Virtualbox, and recently came across this resolution problem: my notebook resolution is 1280X800 and in the virtual machine, it was just not allowing me to set the resolution to this ! Most people asked me to install VBox additions but I had already installed them... others asked me to increase the video memory of the virtual machine to 20 MB because that gave more options for resolution... even then, all other resolution options were there except 1280X800 !!

It was really annoying to have some other resolution and as a last resort, i thought of using the seamless mode (host+L). It was cool, but I had to switch off the compiz effects. Then, i tried the full screen mode again..... and guess what.... the screen resolution was automatically set to 1280X800 !!!

Saturday, October 11, 2008

The GUI doesn't load, shows a crappy binary screen with hell lot of cursors !

The GUI doesn't load, shows a crappy binary screen with hell lot of cursors !

Possible
Solution: 'sudo dpkg-reconfigure -phigh xserver-xorg'


Now, this was the problem I was facing since the last 5 days, and had to resort to the use of
Windows to read the lecture slides coz the tests are on.
Research: I logged in via the recovery mode (as root) and tried the 'startx', 'x', and other X server
commands, but in vain.... everytime the shitty screen came up instead of the cool blue login screen.
I used to log out of the X server mode using 'CTRL+ALT+ BACK SPACE', and the following log
used to be displayed in the root terminal:
-----------------------------------------------------------------
X window System Version 1.3.0
Reles Date: 19 April 2007
X Protocol Version 11, Revision 0, Realease 1.3
Build Operating System: Linux Ubuntu(xorg-server 2:1.3.3.3.dfsg-12ubuntu8.3)
Current operating system: Linux sa...... 2.6.22-14-generic #1 SMP Tue Feb 12
07:42:25 UTC 2008 i686
using file: /etc/X11/Xorg.conf
.
.
(EE) AIGLX: Screen 0 is not DRI capable
xinit": connection to X server lost.
waiting for X server to shut down FreeFontPath: FPE
"user/share/fonts/X11/misc"
refcount is 2, should be 1, fixing.
Now, I checked the mentioned Xorg.conf file, and everything seemed pretty perfect! After 5 days of
messing around here and there, I finally found the solution (though I still don't know the reason why
the hell it occured). I again viewed the Xorg.conf file in less and found some comments how to
reconfigure it. The xorg.conf file looks like this:
# xorg.conf (xorg X Window System server configuration file)
#
# This file was generated by dexconf, the Debian X Configuration
tool, using
# values from the debconf database.
#
# Edit this file with caution, and see the xorg.conf manual page.
# (Type "man xorg.conf" at the shell prompt.)
#
# This file is automatically updated on xserver-xorg package
upgrades *only*
# if it has not been modified since the last upgrade of the
xserver-xorg
# package.
#
# If you have edited this file but would like it to be
automatically updated
# again, run the following command:
# sudo dpkg-reconfigure -phigh xserver-xorg
Section "Files"
EndSection
Section "InputDevice"
Identifier "Generic Keyboard"
Driver "kbd"
Option "CoreKeyboard"
..

.
.
.
.
And I tried reconfigure it, and VOILA ! i am writing this using Open-office doc !(obviously in my GUI).


Happy researching

Sunday, May 4, 2008

Importing Contacts from Gmail to Thunderbird.

Initially, I exported the Gmail address book, in the .csv format and tried to import the file in Thunderbird, but there was some problem. So, incase, you are facing some difficulty, follow the alternate procedure:
  1. Go to the contacts window in your Gmail acccount. Near the end you'd find the options export/import.
  2. Select the export option, and then, the v-card option.
  3. After the download, you'll have a contacts.vcf file probably.
  4. Login into your yahoo mail account (remember I told you: Alternate procedure !!). Go to contacts. Near the top, there'd be an option Export/Import. Import your file (the .vcf file mentioned above). It will notify that all xxx contacts successfully added. (I hope it does !! :) )
  5. Now, again go back to export/import.
  6. Now just below the place you clicked the 'import' button, there'd be an 'export' button with a few options, one of them saying 'for netscape and thunderbird (.ldif)'. Select that button, and Import the file. You will have a .ldif file where you saved it.
  7. Now, go to your Address book in thunderbird. Then to tools/import.
  8. Select the .ldif file. Press OK.
  9. That's it, all the fields 'd b matching correctly.
PS: I know that this method is silly, but it worked very fast for me. There's be methods far better and not so 'alternate', but this is also one of the methids. And more importantly: IT WORKS !!

Configuring Thunderbird for Gmail.

Configuring Thunderbird in UBUNTU for downloading Gmail messages using POP:
Now , this was something that caused me a lot of trouble, and took me a long time to start of with. But recently, I did work.

The problem was that I was using the wrong information, and was baffled when it was not working. Maybe the information worked in some onher environments, but for me it was just the other side of what I needed.

So, the configuration:(assuming that you have already installed Thundebird, obviously)
STEP 0:
in your gmail account, go to settings/forwarding and pop/
Select the radio button which enables POP access .

STEP1:
Download the latest Webmail and Webmail-Gmail plugins from the internet.
The link is: http://webmail.mozdev.org/installation.html

STEP 2:
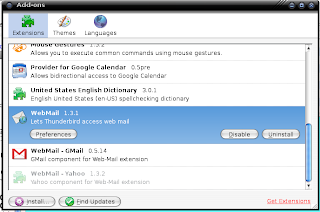
Open thunderbird, go to tools/addons. There will be an option: Install. Click on that, and select your respective plugins (remember there are two of them atleast).

STEP 3:
Restart thunderbird, and again go to tools/addons. You'd see your latest installed plugins there.
Click on the Webmail preferences. Edit it accordingly so that it looks like this:


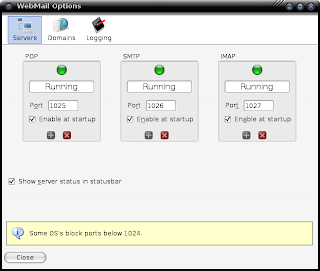
Note that the ports are all greater than 1024. Reason being that my system, and some others block all ports below that. So, this is important. On the internet you would often be asked to put ports like 995 or something, but they might not work.)

STEP 4:
Restart thunderbird and make sure that all the Servers show a green ball, i.e. thy are all running. Now, go to edit/account settings/new account/Gmail Account
Fill in the information like this:


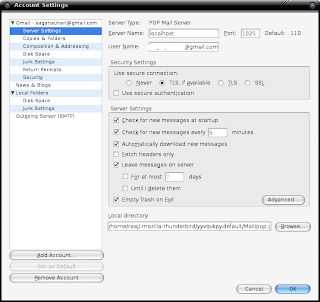
Remember to put 'localhost' in the server box, and the respective server port on shich the server is running (in step 3)

STEP 5:
for the SMTP server, fill in the information like this:


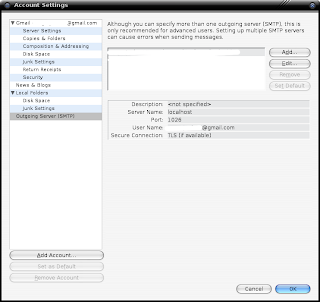
that's all, restart and it should downloading your gmail messages via POP.

any problems, leave comment.