Now I had been facing this problem from quite some time, but recently found a quick solution. Well, by default, the system uses GIJ as the Java byte interpretor and possibly, it causes the applications to freeze. I had installed the sun-java-6 jdk package but it was not functional because gij was the default one.
Steps:
1. Install the sun-java6-sdk package.
2. Find the default jvm being used by your machine by typing: java -version
3. In case it shows 'gij', then type: sudo update-alternatives --config java
It would list all the possible options with a number corresponding to each. For me it shows:
There are 5 alternatives which provide `java'.
Selection Alternative
-----------------------------------------------
1 /usr/bin/cacao
* 2 /usr/lib/jvm/java-6-sun/jre/bin/java
3 /usr/lib/jvm/java-1.5.0-sun/jre/bin/java
4 /usr/bin/gij-4.3
+ 5 /usr/lib/jvm/java-gcj/jre/bin/java
Press enter to keep the default[*], or type selection number:
4. Type in the corresponding number to java-6-sun/jre/bin/java, and press return.
That's all... unsure the version of java again by typing th command in step 2, hopefully you will see something different :)
Saturday, November 8, 2008
Friday, November 7, 2008
How to fix the No Sound problem in Ubuntu 8.10 (Intrepid)
You might have come across the 'no sound' problem after a fresh installation of Ubuntu 8.10 Intrepid. Well, there are a couple of solutions around and this one worked for me :
1. Go to System -> Administration -> Users and Groups
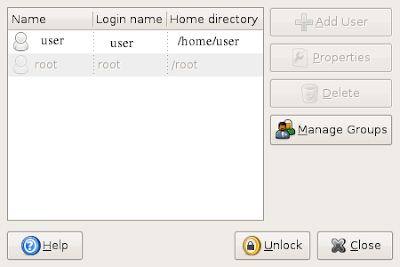
2. Click on 'Unlock' and enter password.
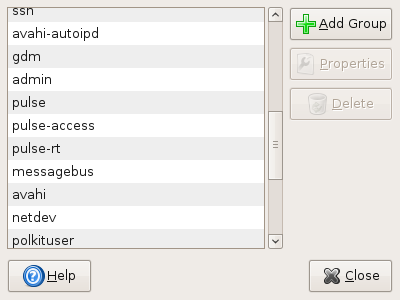
3. Next, go to 'Manage Groups'.
4. Search for the groups 'pulse' and 'pulse access'
5. For both of these, double click on them and add yourself to this group by checking on the check-box.
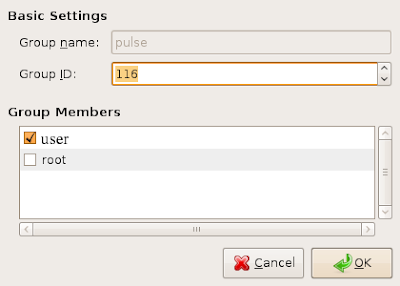
6. Hopefully, you are done !! Logout with ctrl+alt+backspace, and login again.
1. Go to System -> Administration -> Users and Groups

2. Click on 'Unlock' and enter password.
3. Next, go to 'Manage Groups'.
4. Search for the groups 'pulse' and 'pulse access'

5. For both of these, double click on them and add yourself to this group by checking on the check-box.

6. Hopefully, you are done !! Logout with ctrl+alt+backspace, and login again.
Sunday, October 19, 2008
Virtualbox resolution problem
Problem: Guest machine doesn't switch to full screen even after installing VBox additions.
One possible solution:
Switch to seamless mode (host key + L ), and then back to full screen mode. !!
I run Windows XP on Ubuntu using Virtualbox, and recently came across this resolution problem: my notebook resolution is 1280X800 and in the virtual machine, it was just not allowing me to set the resolution to this ! Most people asked me to install VBox additions but I had already installed them... others asked me to increase the video memory of the virtual machine to 20 MB because that gave more options for resolution... even then, all other resolution options were there except 1280X800 !!
It was really annoying to have some other resolution and as a last resort, i thought of using the seamless mode (host+L). It was cool, but I had to switch off the compiz effects. Then, i tried the full screen mode again..... and guess what.... the screen resolution was automatically set to 1280X800 !!!
Saturday, October 11, 2008
The GUI doesn't load, shows a crappy binary screen with hell lot of cursors !
The GUI doesn't load, shows a crappy binary screen with hell lot of cursors !
Possible
Solution: 'sudo dpkg-reconfigure -phigh xserver-xorg'
Now, this was the problem I was facing since the last 5 days, and had to resort to the use of
Windows to read the lecture slides coz the tests are on.
Research: I logged in via the recovery mode (as root) and tried the 'startx', 'x', and other X server
commands, but in vain.... everytime the shitty screen came up instead of the cool blue login screen.
I used to log out of the X server mode using 'CTRL+ALT+ BACK SPACE', and the following log
used to be displayed in the root terminal:
-----------------------------------------------------------------
X window System Version 1.3.0
Reles Date: 19 April 2007
X Protocol Version 11, Revision 0, Realease 1.3
Build Operating System: Linux Ubuntu(xorg-server 2:1.3.3.3.dfsg-12ubuntu8.3)
Current operating system: Linux sa...... 2.6.22-14-generic #1 SMP Tue Feb 12
07:42:25 UTC 2008 i686
using file: /etc/X11/Xorg.conf
.
.
(EE) AIGLX: Screen 0 is not DRI capable
xinit": connection to X server lost.
waiting for X server to shut down FreeFontPath: FPE
"user/share/fonts/X11/misc"
refcount is 2, should be 1, fixing.
Now, I checked the mentioned Xorg.conf file, and everything seemed pretty perfect! After 5 days of
messing around here and there, I finally found the solution (though I still don't know the reason why
the hell it occured). I again viewed the Xorg.conf file in less and found some comments how to
reconfigure it. The xorg.conf file looks like this:
# xorg.conf (xorg X Window System server configuration file)
#
# This file was generated by dexconf, the Debian X Configuration
tool, using
# values from the debconf database.
#
# Edit this file with caution, and see the xorg.conf manual page.
# (Type "man xorg.conf" at the shell prompt.)
#
# This file is automatically updated on xserver-xorg package
upgrades *only*
# if it has not been modified since the last upgrade of the
xserver-xorg
# package.
#
# If you have edited this file but would like it to be
automatically updated
# again, run the following command:
# sudo dpkg-reconfigure -phigh xserver-xorg
Section "Files"
EndSection
Section "InputDevice"
Identifier "Generic Keyboard"
Driver "kbd"
Option "CoreKeyboard"
..
.
.
.
.
And I tried reconfigure it, and VOILA ! i am writing this using Open-office doc !(obviously in my GUI).
Happy researching
Tuesday, September 30, 2008
My google notebook for 'Voice recognition using MATLAB'
Hello people, m currently working on a project 'Speech Recognition',
here's the link to my research notebook:
here's the link to my research notebook:
Sunday, May 4, 2008
Importing Contacts from Gmail to Thunderbird.
Initially, I exported the Gmail address book, in the .csv format and tried to import the file in Thunderbird, but there was some problem. So, incase, you are facing some difficulty, follow the alternate procedure:
- Go to the contacts window in your Gmail acccount. Near the end you'd find the options export/import.
- Select the export option, and then, the v-card option.
- After the download, you'll have a contacts.vcf file probably.
- Login into your yahoo mail account (remember I told you: Alternate procedure !!). Go to contacts. Near the top, there'd be an option Export/Import. Import your file (the .vcf file mentioned above). It will notify that all xxx contacts successfully added. (I hope it does !! :) )
- Now, again go back to export/import.
- Now just below the place you clicked the 'import' button, there'd be an 'export' button with a few options, one of them saying 'for netscape and thunderbird (.ldif)'. Select that button, and Import the file. You will have a .ldif file where you saved it.
- Now, go to your Address book in thunderbird. Then to tools/import.
- Select the .ldif file. Press OK.
- That's it, all the fields 'd b matching correctly.
Configuring Thunderbird for Gmail.
Configuring Thunderbird in UBUNTU for downloading Gmail messages using POP:
Now , this was something that caused me a lot of trouble, and took me a long time to start of with. But recently, I did work.
The problem was that I was using the wrong information, and was baffled when it was not working. Maybe the information worked in some onher environments, but for me it was just the other side of what I needed.
So, the configuration:(assuming that you have already installed Thundebird, obviously)
STEP 0:
in your gmail account, go to settings/forwarding and pop/
Select the radio button which enables POP access .
STEP1:
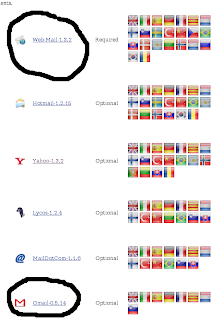
Download the latest Webmail and Webmail-Gmail plugins from the internet.
The link is: http://webmail.mozdev.org/installation.html
STEP 2:
Open thunderbird, go to tools/addons. There will be an option: Install. Click on that, and select your respective plugins (remember there are two of them atleast).
STEP 3:
Restart thunderbird, and again go to tools/addons. You'd see your latest installed plugins there.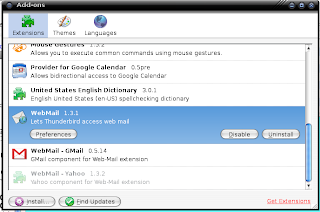
Click on the Webmail preferences. Edit it accordingly so that it looks like this:
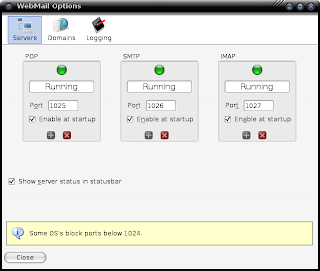
Note that the ports are all greater than 1024. Reason being that my system, and some others block all ports below that. So, this is important. On the internet you would often be asked to put ports like 995 or something, but they might not work.)
STEP 4:
Restart thunderbird and make sure that all the Servers show a green ball, i.e. thy are all running. Now, go to edit/account settings/new account/Gmail Account
Fill in the information like this:

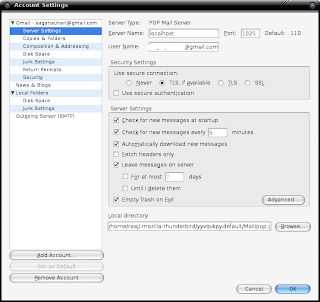
Remember to put 'localhost' in the server box, and the respective server port on shich the server is running (in step 3)
STEP 5:
for the SMTP server, fill in the information like this:
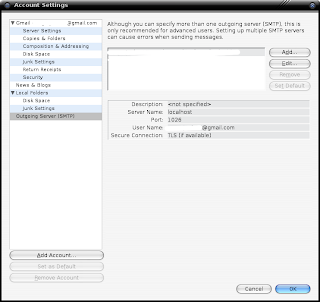
that's all, restart and it should downloading your gmail messages via POP.
any problems, leave comment.
Now , this was something that caused me a lot of trouble, and took me a long time to start of with. But recently, I did work.
The problem was that I was using the wrong information, and was baffled when it was not working. Maybe the information worked in some onher environments, but for me it was just the other side of what I needed.
So, the configuration:(assuming that you have already installed Thundebird, obviously)
STEP 0:
in your gmail account, go to settings/forwarding and pop/
Select the radio button which enables POP access .
STEP1:
Download the latest Webmail and Webmail-Gmail plugins from the internet.
The link is: http://webmail.mozdev.org/installation.html

STEP 2:
Open thunderbird, go to tools/addons. There will be an option: Install. Click on that, and select your respective plugins (remember there are two of them atleast).
STEP 3:
Restart thunderbird, and again go to tools/addons. You'd see your latest installed plugins there.

Click on the Webmail preferences. Edit it accordingly so that it looks like this:

Note that the ports are all greater than 1024. Reason being that my system, and some others block all ports below that. So, this is important. On the internet you would often be asked to put ports like 995 or something, but they might not work.)
STEP 4:
Restart thunderbird and make sure that all the Servers show a green ball, i.e. thy are all running. Now, go to edit/account settings/new account/Gmail Account
Fill in the information like this:


Remember to put 'localhost' in the server box, and the respective server port on shich the server is running (in step 3)
STEP 5:
for the SMTP server, fill in the information like this:

that's all, restart and it should downloading your gmail messages via POP.
any problems, leave comment.
Whew !! New blog!!
Yeah, I started this new blog ,
Normally, everytime I used to do something crazy, I summarized it out in a PDF and kept safely in my backups, lest they become helpful someday!
But then , I thought these summaries might, as well, save someone else's time too!! So, here I fire new blog people.
Normally, everytime I used to do something crazy, I summarized it out in a PDF and kept safely in my backups, lest they become helpful someday!
But then , I thought these summaries might, as well, save someone else's time too!! So, here I fire new blog people.
Subscribe to:
Posts (Atom)