- Go to the contacts window in your Gmail acccount. Near the end you'd find the options export/import.
- Select the export option, and then, the v-card option.
- After the download, you'll have a contacts.vcf file probably.
- Login into your yahoo mail account (remember I told you: Alternate procedure !!). Go to contacts. Near the top, there'd be an option Export/Import. Import your file (the .vcf file mentioned above). It will notify that all xxx contacts successfully added. (I hope it does !! :) )
- Now, again go back to export/import.
- Now just below the place you clicked the 'import' button, there'd be an 'export' button with a few options, one of them saying 'for netscape and thunderbird (.ldif)'. Select that button, and Import the file. You will have a .ldif file where you saved it.
- Now, go to your Address book in thunderbird. Then to tools/import.
- Select the .ldif file. Press OK.
- That's it, all the fields 'd b matching correctly.
Sunday, May 4, 2008
Importing Contacts from Gmail to Thunderbird.
Initially, I exported the Gmail address book, in the .csv format and tried to import the file in Thunderbird, but there was some problem. So, incase, you are facing some difficulty, follow the alternate procedure:
Configuring Thunderbird for Gmail.
Configuring Thunderbird in UBUNTU for downloading Gmail messages using POP:
Now , this was something that caused me a lot of trouble, and took me a long time to start of with. But recently, I did work.
The problem was that I was using the wrong information, and was baffled when it was not working. Maybe the information worked in some onher environments, but for me it was just the other side of what I needed.
So, the configuration:(assuming that you have already installed Thundebird, obviously)
STEP 0:
in your gmail account, go to settings/forwarding and pop/
Select the radio button which enables POP access .
STEP1:
Download the latest Webmail and Webmail-Gmail plugins from the internet.
The link is: http://webmail.mozdev.org/installation.html

STEP 2:
Open thunderbird, go to tools/addons. There will be an option: Install. Click on that, and select your respective plugins (remember there are two of them atleast).
STEP 3:
Restart thunderbird, and again go to tools/addons. You'd see your latest installed plugins there.
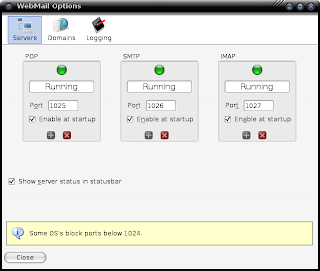
Click on the Webmail preferences. Edit it accordingly so that it looks like this:

Note that the ports are all greater than 1024. Reason being that my system, and some others block all ports below that. So, this is important. On the internet you would often be asked to put ports like 995 or something, but they might not work.)
STEP 4:
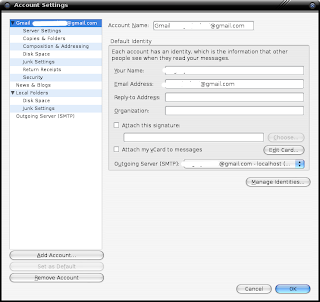
Restart thunderbird and make sure that all the Servers show a green ball, i.e. thy are all running. Now, go to edit/account settings/new account/Gmail Account
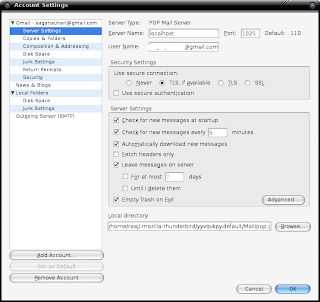
Fill in the information like this:


Remember to put 'localhost' in the server box, and the respective server port on shich the server is running (in step 3)
STEP 5:
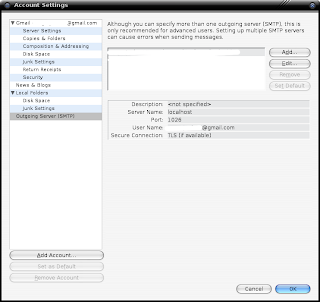
for the SMTP server, fill in the information like this:

that's all, restart and it should downloading your gmail messages via POP.
any problems, leave comment.
Now , this was something that caused me a lot of trouble, and took me a long time to start of with. But recently, I did work.
The problem was that I was using the wrong information, and was baffled when it was not working. Maybe the information worked in some onher environments, but for me it was just the other side of what I needed.
So, the configuration:(assuming that you have already installed Thundebird, obviously)
STEP 0:
in your gmail account, go to settings/forwarding and pop/
Select the radio button which enables POP access .
STEP1:
Download the latest Webmail and Webmail-Gmail plugins from the internet.
The link is: http://webmail.mozdev.org/installation.html

STEP 2:
Open thunderbird, go to tools/addons. There will be an option: Install. Click on that, and select your respective plugins (remember there are two of them atleast).
STEP 3:
Restart thunderbird, and again go to tools/addons. You'd see your latest installed plugins there.

Click on the Webmail preferences. Edit it accordingly so that it looks like this:

Note that the ports are all greater than 1024. Reason being that my system, and some others block all ports below that. So, this is important. On the internet you would often be asked to put ports like 995 or something, but they might not work.)
STEP 4:
Restart thunderbird and make sure that all the Servers show a green ball, i.e. thy are all running. Now, go to edit/account settings/new account/Gmail Account
Fill in the information like this:


Remember to put 'localhost' in the server box, and the respective server port on shich the server is running (in step 3)
STEP 5:
for the SMTP server, fill in the information like this:

that's all, restart and it should downloading your gmail messages via POP.
any problems, leave comment.
Whew !! New blog!!
Yeah, I started this new blog ,
Normally, everytime I used to do something crazy, I summarized it out in a PDF and kept safely in my backups, lest they become helpful someday!
But then , I thought these summaries might, as well, save someone else's time too!! So, here I fire new blog people.
Normally, everytime I used to do something crazy, I summarized it out in a PDF and kept safely in my backups, lest they become helpful someday!
But then , I thought these summaries might, as well, save someone else's time too!! So, here I fire new blog people.
Subscribe to:
Comments (Atom)