Monday, December 28, 2009
An excellent resource for starting off with spectral analysis using MATLAB
An excellent resource for starting off with spectral analysis using MATLAB:
Thursday, September 17, 2009
Google Fast Flip !
Here's some fresh google technology to answer the needs of sloggy networks (like that of my college) that remove the charm of online reading. Today Google rolled out 'Google Fast Flip' (http://fastflip.googlelabs.com) and here's what they have to say about it:
"Fast Flip is a new reading experience that combines the best elements of print and online articles. Like a print magazine, Fast Flip lets you browse sequentially through bundles of recent news, headlines and popular topics, as well as feeds from individual top publishers. As the name suggests, flipping through content is very fast, so you can quickly look through a lot of pages until you find something interesting. At the same time, we provide aggregation and search over many top newspapers and magazines, and the ability to share content with your friends and community. Fast Flip also personalizes the experience for you, by taking cues from selections you make to show you more content from sources, topics and journalists that you seem to like. In short, you get fast browsing, natural magazine-style navigation, recommendations from friends and other members of the community and a selection of content that is serendipitous and personalized."
The speed is indeed way better than the conventional feed readers (and that includes Google Reader) but its probably at the cost of diminished features (well, something has to be optimized after all). Seems there is also a mobile version for Fast Flip .. haven't yet checked it out. Nice experiment google labs!
Friday, September 11, 2009
GSOC: BITS Pilani goa Campus in Top 10 Schools in 2009 by # of Accepted Students
Ah! here's some awesome news for my college! In Google Summer of Code, it ranks in the top 10 Schools in 2009 by number of Accepted Students! Here's the link:
http://google-opensource.blogspot.com/2009/09/tasty-new-google-summer-of-code-stats.html
http://google-opensource.blogspot.com/2009/09/tasty-new-google-summer-of-code-stats.html
Tuesday, August 25, 2009
Pidgin 2.6.1 is here !

A major upgrade of the favorite universal chat client 'Pidgin' has been released.
Detailed instructions of installations or upgrading can be found here. Some of the major upgrades are the new Voice and Video support for XMPP !! Hurray ! Apart form that, the general icons have also been changed and they now look much more decent. Check it out for yourselves !
Apt-get: Cannot initiate the connection to 8080:80 (0.0.31.144).
I've seen this problem sometimes cropping up! One of the reasons this problem can occur is when your http_proxy variable is not set properly!
The $http_proxy variable in your terminal overrides the http::proxy variable in /etc/apt/conf file and the connection is not established if the http_proxy variable in the terminal is set to [proxy]:[port] instead of http://[proxy]:[port]. To check this out do the following:
The $http_proxy variable in your terminal overrides the http::proxy variable in /etc/apt/conf file and the connection is not established if the http_proxy variable in the terminal is set to [proxy]:[port] instead of http://[proxy]:[port]. To check this out do the following:
- Type: echo $http_proxy in the terminal
- If it is something like this: 10.1.1.30:8080, then type: http_proxy="http://10.1.1.30:8080" . (we're just adding the 'http://' before the content of the variable)
Saturday, June 27, 2009
Space Invaders FX : Part 2
So, continuing with my last post where I described the 'tanks' class, we will discuss the 'monster' class in this post:
/*
* monsters.fx
*
* Created on Jun 21, 2009, 9:28:33 AM
*/

package spaceinvadersfx;

import javafx.animation.KeyFrame;
import javafx.animation.Timeline;
import javafx.scene.CustomNode;
import javafx.scene.Group;
import javafx.scene.image.Image;
import javafx.scene.image.ImageView;
import javafx.scene.Node;
import javafx.scene.paint.Color;
import javafx.scene.shape.Polygon;
import javafx.scene.transform.Rotate;
import spaceinvadersfx.Main;

/**
* @author Sagar Jauhari
*/

public class monsters extends CustomNode {
var bulletX: Integer;
var bulletY: Integer;

public var monsterX: Integer;
public var monsterY: Integer = 10;

var animationRate = 1;
var visiblity = true;
var bulletVisiblity = false;
var rotation = 0;
var image = ImageView {
x: bind monsterX
y: bind monsterY
visible: bind visiblity
image: Image {
url: "{__DIR__}resources/monster.png"
}
transforms: Rotate { pivotX : bind monsterX+25, pivotY : bind monsterY+25, angle: bind rotation }
}

var timeline = Timeline {
rate: bind animationRate;
repeatCount: Timeline.INDEFINITE
autoReverse: true
keyFrames : [
at (0s) {monsterX => 0;},
at (4s) {monsterX => 440;}
]
}

var attackTimeline = Timeline {
repeatCount: 1
keyFrames : [
]
}


function attack(){
var bullet = Polygon {
transforms: Rotate { pivotX : 5, pivotY : 0.8, angle: 180 }
visible: bind bulletVisiblity
translateX: bind bulletX
translateY: bind bulletY
points : [ 0,7, 5,0, 10,7, 10,16, 5,5, 0,16 ]
fill: Color.YELLOW
stroke: Color.RED
}

}


public function isDead(){
timeline.pause();
var isDeadTimeline = Timeline {
repeatCount: 1
keyFrames : [
   at (0s){rotation => 0},
   at (0.2s){rotation => 180;},
   KeyFrame {
       time: 0.6s
       action: function(){
           Main.score+=15;
           rotation = 0;
           timeline.playFromStart();
       }
   }
]
};
isDeadTimeline.play();
}

public override function create(): Node {
timeline.play();
return Group {
content: bind [image]
};
}
}
- We make an ImageView object for the monster and bind the x and y coordinates
 to variables to allow movement. Also, the 'rotation' transformation is added which will be used to animate the monster when it dies ( it turns upside down when the isDead() function is called! :) ).
 var image = ImageView {
x: bind monsterX
y: bind monsterY
visible: bind visiblity
image: Image {
url: "{__DIR__}resources/monster.png"
}
transforms: Rotate { pivotX : bind monsterX+25, pivotY : bind monsterY+25, angle: bind rotation }
} - Next, we define the timeline for making the monster move to and fro. The to and fro motion is enabled by the "autoReverse: True" expression.
 var timeline = Timeline {
 rate: bind animationRate;
 repeatCount: Timeline.INDEFINITE
 autoReverse: true
 keyFrames : [
 at (0s) {monsterX => 0;},
 at (4s) {monsterX => 440;}
 ]
} - After this, we write the isDead function . This function pauses the timeline we wrote above and rotates the monster by 180 degrees and then makes the timeline play from start. It also increases you score by 15 points.
public function isDead(){
   timeline.pause();
   var isDeadTimeline = Timeline {
       repeatCount: 1
       keyFrames : [
           at (0s){rotation => 0},
           at (0.2s){rotation => 180;},
           KeyFrame {
               time: 0.6s
               action: function(){
                   Main.score+=15;
                   rotation = 0;
                   timeline.playFromStart();
               }
           }
       ]
   };
   isDeadTimeline.play();
} - This was most of what was done in this class. You would have noticed that we haven't used the attackTimeline and the attack() function. I was writing them to enable the monster attack the player also, but i haven't finished that part. So, we'll skip them for the while. Now we jump to the important part: Collision Detection. Our task is gravely simplified by the intersects() function of the Node class. It returns true when your node intersects the mentioned rectangle. Read the API for details. Here are the snippets from the prevous class, tanks.fx:
    public function colissionDetect(){
    if(monster.intersects(bulletX,bulletY,10,15)){
        monster.isDead();
    }

}
We've defined our rectangle with respect to the coordinates of the bullet using the bulletX and bulletY variables. Whenever the monster intersects this bullet, the monster.isDead() function is triggered. Note that we are polling to verify the intersection every 0.1 second by playing the colissionTimeline variable:
This timeline is played throughout the duration of the game.var colissionTimeline = Timeline {
repeatCount: Timeline.INDEFINITE
keyFrames : [
KeyFrame {
time : 0.1s
action: function(){colissionDetect()}
}
]
}

/*
* Main.fx
*
* Created on Jun 21, 2009, 9:17:55 AM
*/
package spaceinvadersfx;
import javafx.stage.Stage;
import javafx.scene.Scene;
import javafx.scene.text.Text;
import javafx.scene.text.Font;
import javafx.scene.media.Media;
import javafx.scene.media.MediaPlayer;
/**
* @author Sagar Jauhari
*/
public var score = 0;
public var lives = 3;
public var screenWidth = 500;
public var screenHeight = 500;
var scoreText = Text {
font : Font {
size: 20
}
x: screenWidth-40, y: screenHeight-30
content: bind {java.lang.String.valueOf(score)}
};
var mdeia = MediaPlayer {
media : Media {
source: ""
}
}
public function run(){
Stage {
title: "Space Invaders FX by Sagar Jauhari"
width: 500
height: 500
scene: Scene {
content: bind [tank{},scoreText]
}
}
}
More to be done:
- The monster has to be coded to attact the tank also! Right now the game is too easy!
- Background music can be played and specific sounds can be added to the fire() and isDead() functions.
Wednesday, June 24, 2009
Space Invaders FX : Part 1
Ohk, so I wrote this simple game in JavaFX, named it Space Invaders FX ..
The entire source code for the game can be downloaded from here.
The source code has three files, tank.fx, monster.fx and Main.fx. In this post we will talk about tank.fx. This class controls the movements, shooting and everything else to do with the tank. Here it is:
Understanding the code:
The entire source code for the game can be downloaded from here.
The source code has three files, tank.fx, monster.fx and Main.fx. In this post we will talk about tank.fx. This class controls the movements, shooting and everything else to do with the tank. Here it is:
/*
* tank.fx
*
* Created on Jun 21, 2009, 9:19:12 AM
*/
package spaceinvadersfx;
import javafx.scene.image.ImageView;
import javafx.scene.image.Image;
import javafx.scene.CustomNode;
import javafx.scene.Node;
import javafx.scene.input.KeyEvent;
import javafx.scene.input.KeyCode;
import javafx.scene.Group;
import javafx.scene.input.MouseEvent;
import javafx.scene.shape.Polygon;
import javafx.scene.paint.Color;
import javafx.animation.Timeline;
import javafx.animation.KeyFrame;
import javafx.animation.Interpolator;
/**
* @author Sagar Jauhari
*/
public class tank extends CustomNode {
var monster = monsters{};
var fireAgain = true;
var tankX: Integer;
var tankY = 400;
var bulletX: Integer;
var bulletY = 400;
var visiblity = false;
var image = ImageView {
x: bind tankX, y: tankY
image: Image {
url: "{__DIR__}resources/tank 50X50.png"
}
};
var bg = ImageView {
onKeyPressed: function( e: KeyEvent ) {
if(e.code == KeyCode.VK_LEFT){
if(tankX >= 50){
tankX-=50;
}
}
if(e.code == KeyCode.VK_RIGHT){
if(tankX <= Main.screenWidth - 100){
tankX+=50;
}
}
}
onMouseClicked: function( e: MouseEvent ):Void {
fire();
}
image: Image {
url: "{__DIR__}resources/bg.jpg"
}
};
var bullet = Polygon {
visible: bind visiblity
translateX: bind bulletX
translateY: bind bulletY
points : [ 0,7, 5,0, 10,7, 10,15, 5,5, 0,15 ]
fill: Color.YELLOW
stroke: Color.RED
}
var timeline = Timeline {
repeatCount: 1
keyFrames : [
at (0s) {bulletX => tankX+20; bulletY => tankY; visiblity => true; fireAgain=> false },
at (1s) {bulletY=> -20; visiblity => true; fireAgain=> true}
]
}
    var colissionTimeline = Timeline {
    repeatCount: Timeline.INDEFINITE
    keyFrames : [
        KeyFrame {
            time : 0.1s
            action: function(){colissionDetect()}
        }
    ]
}
public function fire(){
if(fireAgain){
timeline.playFromStart();
}
}
public function colissionDetect(){
if(monster.intersects(bulletX,bulletY,10,15)){
monster.isDead();
}
}
public override function create() :Node{
bg.requestFocus();
colissionTimeline.play();
return{
Group{
content: bind[bg,image,bullet,monster]
}
}
}
}
Understanding the code:

- First of all, we make an image of tank of 50X50px. Here's the image I made in GIMP:
- Next, we import it for using:
    var image = ImageView {
 x: bind tankX, y: tankY
 image: Image {
     url: "{__DIR__}resources/tank 50X50.png"
 }
}; - Now we put a background image and add all the mouse and keyboard triggers to it.
 var bg = ImageView {
onKeyPressed: function( e: KeyEvent ) {
  if(e.code == KeyCode.VK_LEFT){
      if(tankX >= 50){
          tankX-=50;
      }
  }
  if(e.code == KeyCode.VK_RIGHT){
      if(tankX <= Main.screenWidth - 100){
          tankX+=50;
      }
  }

}
  onMouseClicked: function( e: MouseEvent ):Void {
      fire();
  }


  image: Image {
      url: "{__DIR__}resources/bg.jpg"
  }
}; - Now we come to the more interesting part: the shooting! :). To represent a bullet, I made a polygon. The idea is to traverse this polygon from bottom to top by binding its y coordinate to a variable and linearly varying that variable with time using the Timeline class. Initially the bullet is invisible, then, while shooting it becomes visible and then again it becomes invisible. This gives the impression that multiple bullets are being shot contrary to the fact that actually, it is the same bullet again and again! Also, there is a constraint that at any point of time, only one bullet is in the scene. This is managed by the 'fireAgain' flag. See here:
    var bullet = Polygon {
   visible: bind visiblity
   translateX: bind bulletX
   translateY: bind bulletY
   points : [ 0,7, 5,0, 10,7, 10,15, 5,5, 0,15 ]
   fill: Color.YELLOW
   stroke: Color.RED
}

var timeline = Timeline {
   repeatCount: 1
   keyFrames : [
       at (0s) {bulletX => tankX+20; bulletY => tankY; visiblity => true; fireAgain=> false },
       at (1s) {bulletY=> -20; visiblity => true; fireAgain=> true}
   ]
} - Finally, there's this function called fire() which fires the bullet.
    public function fire(){
    if(fireAgain){
        timeline.playFromStart();
    }
}
Friday, May 15, 2009
Installing adobe flash plugin on Ubutnu 9.04 ( Jaunty )
I found a way to install the adobe flash plugin on my ubuntu box. Till now I was trying to install the .deb package from the adobe site which is named as (ubuntu 8.04+ ) and it alway got installed but never worked! So here's a way:
- Download this package.
- Close your firefox.
- Open it with your archive manager and extract it in you home directory.
- Open a terminal and type: $~/install_flash_player_10_linux/flashplayer-installer
- Follow the instructions and do a 'yes' when it says that the plugin will be installed in your home directory in the .mozilla folder.
Saturday, May 2, 2009
Idea Netsetter on Ubuntu Jaunty Jackalope : Step by step procedure
It took some time but I managed to configure the Idea Netsetter wireless USB plug and surf device on my Ubuntu laptop. It wasn't as tough as I had thought. Here's the procedure:
Step 1. Write the following in your /etc/wvdial.conf file, save and close:
[Dialer Defaults]
Modem=/dev/ttyUSB0
Baud = 460800
Init 1 = AT+CGMM
Init 2 = AT+CMEE=1
Init 3 = ATE0
Init 4 = AT^HS=0,0
Init 5 = AT+CFUN?
Init 6 = AT+CLCK="SC",2
Init 7 = AT+CPIN?
Init 8 = AT+CLCK="SC",2
Modem Type = USB MODEM
Phone=*99#
Username = idea
Password = idea
Dial Command=ATDT
Stupid Mode=1
ISDN=0
APN = internet
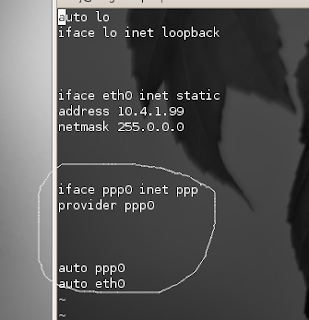
Step 2. Add the following lines to your /etc/network/interfaces file:
iface ppp0 inet ppp
provider ppp0
auto ppp0
It would look something like this (only the encircled part is important):
Step 3. Restart the network services by the following command:
$ sudo /etc/init.d/networking restart
Step 4. Go to System-> Administration -> Network. You'd see something like this:
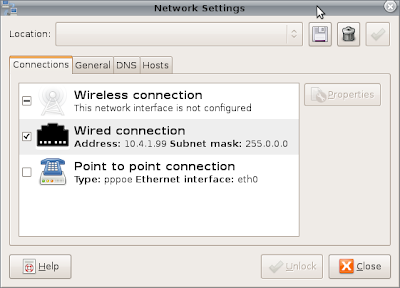
Uncheck the 'Wired' connection (disable it). Now go to the properties of Point to point connection do the following settings in the respective tabs:
[GENERAL]:
Step 5. Again restart the network connection (step 3).
Step 6. Plug in your Idea Netsetter in one of the USB ports and run the following command in your terminal:
$ sudo wvdial
That's it .. if everything's fine wvdial would show your new Local and Remote IP address for the idea connection.
Have fun.
Step 1. Write the following in your /etc/wvdial.conf file, save and close:
[Dialer Defaults]
Modem=/dev/ttyUSB0
Baud = 460800
Init 1 = AT+CGMM
Init 2 = AT+CMEE=1
Init 3 = ATE0
Init 4 = AT^HS=0,0
Init 5 = AT+CFUN?
Init 6 = AT+CLCK="SC",2
Init 7 = AT+CPIN?
Init 8 = AT+CLCK="SC",2
Modem Type = USB MODEM
Phone=*99#
Username = idea
Password = idea
Dial Command=ATDT
Stupid Mode=1
ISDN=0
APN = internet
Step 2. Add the following lines to your /etc/network/interfaces file:
iface ppp0 inet ppp
provider ppp0
auto ppp0
It would look something like this (only the encircled part is important):

Step 3. Restart the network services by the following command:
$ sudo /etc/init.d/networking restart
Step 4. Go to System-> Administration -> Network. You'd see something like this:

Uncheck the 'Wired' connection (disable it). Now go to the properties of Point to point connection do the following settings in the respective tabs:
[GENERAL]:
- Check on 'Enable this connection'
- Connection type: PPPoE
- Username: idea
- password: idea
- Ethernet interface: eth0
- Check 'Set modem as default'
- Check 'Use the internet service provider nameservers'
- Check 'Retry if connection breaks'
Step 5. Again restart the network connection (step 3).
Step 6. Plug in your Idea Netsetter in one of the USB ports and run the following command in your terminal:
$ sudo wvdial
That's it .. if everything's fine wvdial would show your new Local and Remote IP address for the idea connection.
Have fun.
Wednesday, April 1, 2009
Useful command to edit .conkyrc
Friends this is a simple command I use whenever I edit my conkyrc file:
$while true; do conky -q -i 10; sleep 3; done
Starting conky this way kills it and restarts it after every 3+10*n seconds, where n is the update interval mentioned in your conkyrc file. So, you can open ~/.conkyrc file in your editor run the above command. You would see the changes on the conky right on your desktop as it is restarted again and again. (please dont forget to keep saving the file as you edit it to make this thing work).
By the way, I have edited a conkyrc file i found on a webiste and finetuned it !! My conky is simply amazing now :) I'd post the file in my next post (and a snapshot of my desktop).
Friday, March 20, 2009
Switching to ( or changing ) static IP address on Ubuntu Intrepid
Today, somehow the network of my college got reconfigured or something, and all subnets got changed hostel wise. Hence, the network wasn't being accessed by the old IP addresses. Now, in the earlier versions of Ubuntu (before Intrepid) it was relatively easy to change the static IP addresses from the Network Manager in the panel, but Intrepid onwards, this intreface has been changed and I had been wondering for a while how to do it. Now, today, since it was an absolutely desperate situation, I finally figured a way out.
Solution:-
Open the file /etc/network/interfaces in your favourite editor:
$ sudo gedit /etc/network/interfaces
You would find something like this:
auto lo
iface lo inet loopback
iface eth0 inet static
address 10.4.1.41
netmask 255.0.0.0
auto eth0
-
If you don't find the last 4 lines in this file, then your network configuration is set to dynamic IP. So, add these four lines to the end of this file. And, if your see these lines, it means your have previously set your IP address to static. Now, to change your static adderss, change the address given below the line 'iface eth0 static' (here, 10.4.1.41)to whatever address u want.
-
Finally, restart the networking service by the command:
$sudo /etc/init.d/networking restart
-
Verify the change by the command:
You would see the new IP address in the eth0 section!
~~~~~~~~~~~~~~~~~~~~~~~~~~~~~~~~~~~~~~~~~~~
Now, I stumbled upon this solution when I was checking out the man pages of 'ip' and related commands and then I tried the command for restarting the network. When it didn't work, I opened the file /etc/init.d/networking and found that that the script uses the files in the /etc/network directory. There I found the file named 'interfaces' and upon opening it, I knew this was what I was searching for!
Wednesday, March 18, 2009
Problems in installing Netbeans IDE 6.5 on Ubuntu Intrepid [solved]
I had some problems installing the Netbeans IDE 6.5 on Ubuntu Intrepid. After running the file netbeans-6.5-python-linux.sh in the terminal, there was an error:
net beans lexical error or unexpected token, expected valid token
If you are facing similar problems, refer to earlier post :
JAVA Swing and AWT applications freezing in Ubuntu
The solution to this problem is the same as mentioned in the above post. Though I had been using Netbeans 6.1, the configuration had changed somehow! Anyways, after following the instructions, the problem should get solved.
Happy Netbean-ing ..
Monday, March 16, 2009
note
I've changed the URL (from linuxlark.blogspot.com to technolark.blogspot.com) and the name of this blog. Please bear with the trouble
Tuesday, February 3, 2009
Thunderbird wrap text problem [sloved]
Well, I saw many people having problem with Thunderbird not wrapping text at the default set 72 chars. Huh, I figured out the solution. The edit/options >preferences > composition > general tab has an entry box saying
"wrap plain text messages at __ characters"
the default set is 72 characters. Now what happens is that most of the mails that we send are HTML or 'unknown' by default. And the entry box says "plain text" not HTML. So, go to the most frequently mailed addresses in your addressbook in thunderbird and select 'plain' text message as the default in the contact details for each. :) it was not a problem, it was just obvious !!
Sunday, February 1, 2009
How to write html tags in blog posts:
In the course of writing my previous post, I also learnt how to write html tags like <hello> in blog posts. All you have to do is substitute the < and > tags by  writing
and
respectively
 writing
and

respectively
Disabling remote access to phpmyadmin
I installed the LAMP + phpmyadmin combo yesterday on my Ubuntu Intrepid machine for hosting a local website.
But later I realized that the phpmyadmin page, though password protected, was visible throughout my local network! So, to disable remote access to phpmyadmin , add the following code to the end of your /etc/apache2/apache2.conf file ..
# Disabling phpmyadmin for remote access
<directory>
Order Deny,Allow
Deny from all
Allow from localhost
</directory>
Saturday, January 17, 2009
Project download manager
Ohk guys .. I am starting off with building a GUI based download manager for Linux. I found this excellent tutorial on building a GUI using Glade 2 (with Gnome support). Pretty neat with ample description of the components.
glade2_introduction.html
glade2_introduction.html
Subscribe to:
Posts (Atom)