- Download this package.
- Close your firefox.
- Open it with your archive manager and extract it in you home directory.
- Open a terminal and type: $~/install_flash_player_10_linux/flashplayer-installer
- Follow the instructions and do a 'yes' when it says that the plugin will be installed in your home directory in the .mozilla folder.
Friday, May 15, 2009
Installing adobe flash plugin on Ubutnu 9.04 ( Jaunty )
I found a way to install the adobe flash plugin on my ubuntu box. Till now I was trying to install the .deb package from the adobe site which is named as (ubuntu 8.04+ ) and it alway got installed but never worked! So here's a way:
Saturday, May 2, 2009
Idea Netsetter on Ubuntu Jaunty Jackalope : Step by step procedure
It took some time but I managed to configure the Idea Netsetter wireless USB plug and surf device on my Ubuntu laptop. It wasn't as tough as I had thought. Here's the procedure:
Step 1. Write the following in your /etc/wvdial.conf file, save and close:
[Dialer Defaults]
Modem=/dev/ttyUSB0
Baud = 460800
Init 1 = AT+CGMM
Init 2 = AT+CMEE=1
Init 3 = ATE0
Init 4 = AT^HS=0,0
Init 5 = AT+CFUN?
Init 6 = AT+CLCK="SC",2
Init 7 = AT+CPIN?
Init 8 = AT+CLCK="SC",2
Modem Type = USB MODEM
Phone=*99#
Username = idea
Password = idea
Dial Command=ATDT
Stupid Mode=1
ISDN=0
APN = internet
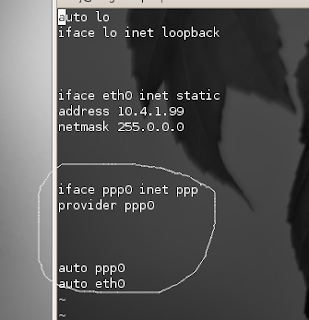
Step 2. Add the following lines to your /etc/network/interfaces file:
iface ppp0 inet ppp
provider ppp0
auto ppp0
It would look something like this (only the encircled part is important):
Step 3. Restart the network services by the following command:
$ sudo /etc/init.d/networking restart
Step 4. Go to System-> Administration -> Network. You'd see something like this:
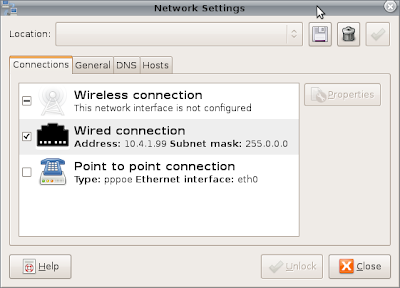
Uncheck the 'Wired' connection (disable it). Now go to the properties of Point to point connection do the following settings in the respective tabs:
[GENERAL]:
Step 5. Again restart the network connection (step 3).
Step 6. Plug in your Idea Netsetter in one of the USB ports and run the following command in your terminal:
$ sudo wvdial
That's it .. if everything's fine wvdial would show your new Local and Remote IP address for the idea connection.
Have fun.
Step 1. Write the following in your /etc/wvdial.conf file, save and close:
[Dialer Defaults]
Modem=/dev/ttyUSB0
Baud = 460800
Init 1 = AT+CGMM
Init 2 = AT+CMEE=1
Init 3 = ATE0
Init 4 = AT^HS=0,0
Init 5 = AT+CFUN?
Init 6 = AT+CLCK="SC",2
Init 7 = AT+CPIN?
Init 8 = AT+CLCK="SC",2
Modem Type = USB MODEM
Phone=*99#
Username = idea
Password = idea
Dial Command=ATDT
Stupid Mode=1
ISDN=0
APN = internet
Step 2. Add the following lines to your /etc/network/interfaces file:
iface ppp0 inet ppp
provider ppp0
auto ppp0
It would look something like this (only the encircled part is important):

Step 3. Restart the network services by the following command:
$ sudo /etc/init.d/networking restart
Step 4. Go to System-> Administration -> Network. You'd see something like this:

Uncheck the 'Wired' connection (disable it). Now go to the properties of Point to point connection do the following settings in the respective tabs:
[GENERAL]:
- Check on 'Enable this connection'
- Connection type: PPPoE
- Username: idea
- password: idea
- Ethernet interface: eth0
- Check 'Set modem as default'
- Check 'Use the internet service provider nameservers'
- Check 'Retry if connection breaks'
Step 5. Again restart the network connection (step 3).
Step 6. Plug in your Idea Netsetter in one of the USB ports and run the following command in your terminal:
$ sudo wvdial
That's it .. if everything's fine wvdial would show your new Local and Remote IP address for the idea connection.
Have fun.
Subscribe to:
Posts (Atom)